Pink Half Cut Crease Eyeshadow Tutorial for Beginners
Hello everyone,
Today, I bring you a pink cut crease eyeshadow tutorial with pictures that is really easy to do. It is not so soft but not super dramatic, at least in my mind. For this eye look, I used Huda Beauty's "The New Nude" Eyeshadow Palette, which I love since the colors are neutral and can be used for everyday looks. However, it also includes glitter so "glam" looks can also be created.
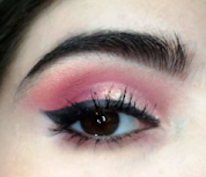
This is the finished eye look. As you can see, I have not threaded my eyebrows in a while! I hope to go and do them soon since I rarely do them myself (I am too scared to do them, but I might try and let you know what happens lol)
1. I prepped my eye area with concealer and powder on top.

2. I used a big blending brush to add this pale shadow ("Bare") to my crease and I blended it. Remember that even when I am using the Huda Beauty palette, you might use any other similar eyeshadows for this look


3. I added this pink eyeshadow ("Tickle") to my crease with a medium blending brush and just blended it in a circular motion.


4. I applied this almost purple shadow ("Spanked") with the same brush as before, on my crease, and blended the colors together.


5. I put concealer on this angled brush and drew the crease. Then, I filled it out. It is so much easier to use this kind of brush for that than any flat brush! It allows for the crease to be more precise. I used Tarte's Shape Tape Concealer for this.


6. I then applied this Ciate's Cream Eyeshadow ("London Eye Luster") over the crease I just drew. Then, I blended the Cream Eyeshadow and the almost purple eyeshadow ("Spanked") together with the big blending brush I used at first.


7. I added this glitter ("Crave") from the Huda Palette. I put it on the inner corner of my eye and on my brow bone with a very small fluffy brush. Then, I added an eyeliner with a small flat brush. I used Morphe's Gel Eyeliner in black ("Jet").


8. I just blended what was left on my medium blending brush into the outside of my waterline. After that, I just curled my eyelashes and added mascara primer and mascara. I used the Tarteist Mascara, on that same link, this time.

9. That's it!

For me, this is a simple look. However, as the eyeliner is kind of thick, I would, personally, wear this look for going out rather than for everyday makeup look. What do you think?
I hope you enjoyed this tutorial! As always, feel free to comment below!

I feel like all of our eyebrows are looking a little too fluffy these days haha! I love this look!
ReplyDeleteI know, right? lol thank you very much!
Delete